Introduction
3D printing offers incredible opportunities to create custom collectibles, cosplay props, and eye-catching art. Recently, I completed a Wolverine helmet project with the FLSUN V400, based on an intricate 3D model from Do3D.com. The result is a polished, high-quality helmet that perfectly captures Wolverine’s iconic style. In this guide, I’ll walk you through every step of the project—from printer settings and materials to painting and final assembly.
Table of Contents
- Choosing the Right 3D Model
- Optimal Printer Settings for FLSUN V400
- Material and Filament Choice
- Preparation: Sanding and Priming
- Painting Techniques for a Glossy Finish
- Assembly with Magnets
- Final Product Showcase
- FAQs
1. Choosing the Right 3D Model
The model I chose from Do3D.com offered exceptional detail, specifically designed for 3D printing. Choosing a high-quality STL file is crucial for accuracy, reducing the need for excessive post-processing. Look for multi-part files for easier painting and assembly, especially with complex cosplay pieces.
Image from Do3D.com
2. Optimal Printer Settings for FLSUN V400
Fine-tuning printer settings is key to achieving a high-quality print. Here’s how I set up my FLSUN V400 for optimal results:
- Filament Temperature: 210°C
- Bed Temperature: 60°C
- Layer Height: 0.16 mm for enhanced detail
- Infill: 20% for strength without excessive material use
- Print Speed: 200 mm/s for balanced detail and efficiency
- Supports: Tree Supports (seemed to handle the nose well)
Pro Tip: Handle the nose portion with care—it’s especially delicate and may need reinforcement.
3. Material and Filament Choice
For this project, I used Elegoo Black Matte Rapid PLA+. This filament’s sturdy finish works well with post-processing, while the black base allows for painting flexibility. For the yellow sections, I painted directly over the black, minimizing material costs.
4. Preparation: Sanding and Priming
To retain some of the helmet’s natural texture, I opted for light sanding instead of a fully smooth surface. This approach added a rugged, authentic touch to the final look.
- Sanding: A single pass with 100-grit sandpaper to reduce major print lines while keeping surface texture.
- Priming: Thin coats of primer for paint adhesion and to create a cohesive base.
5. Painting Techniques for a Glossy Finish
Using Rust-Oleum Gloss Protective Enamel in Yellow I aimed for a vibrant, polished effect. Here’s the painting breakdown:
- Base Coat: Applied a light coat of gloss yellow followed by additional layers for a bold finish.
- Detail Work: Left the ear and eye sections in the original black, contrasting well with the glossy yellow for subtle, defined features.
The gloss highlights the helmet’s contours, enhancing the display quality.
6. Assembly with Magnets
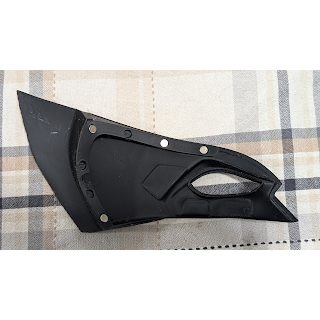
To create a flexible yet secure fit, I used small magnets to attach the ear and eye pieces, allowing for easy adjustments.
Nose broke off during a move
Magnet Fitting Tips:
- Placement: Use small but strong magnets for reliable hold without compromising the appearance.
- Hole Adjustment: Widen holes slightly with a soldering iron for a snug fit.
- Adhesion: Apply a small amount of super glue to secure the magnets, ensuring they align properly.
7. Final Product Showcase
Here’s the final look after assembly and finishing touches. The contrasting matte black and glossy yellow give it a screen-ready, striking appearance!
Final Thoughts and Tips
Completing this Wolverine helmet was an immensely rewarding project. With the right model, settings, and painting techniques, you can achieve a display-worthy result that looks professionally crafted. A few tips for anyone looking to start a similar 3D printing project:
- Opt for High-Quality STL Files: Detailed files ensure a clean final product.
- Test Print Small Sections First: Test settings on small pieces for optimal layer adhesion and alignment.
- Invest in Quality Paint and Primer: High-grade paint and primer make a big difference, especially for cosplay props.
Stay tuned for photos of this project in action! Whether you're a Wolverine fan or a 3D printing enthusiast, I hope this guide inspires your next creation.
FAQs
Can I use other filaments besides PLA+?
Yes, ABS or PETG are great alternatives for added durability, though they may require different print settings.
What paints work best on PLA+?
Acrylics and spray paints designed for plastics adhere well to PLA+ surfaces.
Is sanding necessary before painting?
It depends on your desired finish. For a polished look, sanding is highly recommended.
What glue should I use for PLA+ parts?
Super glue or epoxy bonds well with PLA+ and provides a strong hold.
Do I need to prime my 3D prints?
Priming helps with paint adhesion and provides a more professional finish. While optional, it’s highly recommended.


